Home Sweet Home: Creating custom art to liven up your walls

May 1st, 2015

photo1By Cathy Osoria

Spending thousands of dollars on artwork for the home is not necessary. If one creates his own artwork, the colors, style and shapes can be customized per one’s personal taste. Creating custom art allows one to be able to take extra pride when creating beautiful rooms.

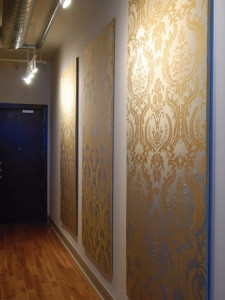
Frame fabric, wallpaper or scrapbook paper
These papers come in an array of trendy colors and patterns for easy and inexpensive artwork. Select patterns that can be mixed together to match the room’s color scheme and decor and display in matching frames to create a beautiful creative wall art.

photo
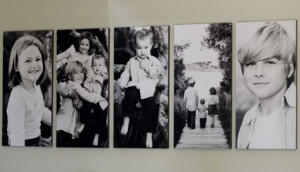
Use personal photos for artwork
Gallery photography can be expensive so try using personal photographs as art.  Take high-resolution digital pictures (most standard cameras are high resolution; phone cameras may not work).Then select the ones to be enlarged for the creation of a personalized grouping.  There are many online photo to canvas companies (Canvas4life) that allow a photo to be plugged in and the resolution and color to be tested before ordering and printing. This eliminates the fear of the print turning out blurry.  The photos selected can be cropped (maybe only partially showing the subject) or color brightened or reduced to black and white.  Be creative. All kinds of experimenting can be performed before placing the order.

Paint chip art
Pick up a few paint samples when visiting the local home improvement store. (Actually, more than a few may be needed.) Using a pre-stretched canvas from a craft or art supply store, attach the paint chips in any preferred pattern and attach with a thumbtack to create colorful custom art.

chipschipsBubble wrap art
Using bubble wrap already on hand, paint acrylic (from craft store)  paint on top of the bubbles in stripes and in favorite colors. Then flip the painted side over quickly, place it on pre-stretched canvas or water color paper, and press lightly. Lift off the plastic wrap to see the final result.

Masking tape art
Using pre-stretched canvas, paint an acrylic base coat of selected color and let it dry fully. Then get blue painter’s tape (one inch works well) and tape in random patterns on top of what was painted earlier.  Tape can be placed in X’s or stripes or diagonals or any other selected pattern. Next, paint in multiple colors (4 or 5 of acrylic paints) across the placed tape on canvas.  Let that layer dry,then pull off the painter’s tape to reveal a masterpiece.

photo7Art with meaning
One can think of a saying he likes and wishes to display. Purchase the sticky vinyl letters at a craft store. Using pre-stretched canvas, paint in acrylic paints multiple colors in random patterns across the canvas and allow to dry.  A thrift store painting or a painting already owned can be used.  Place and stick the verbiage of your choice in the vinyl letters onto the painting or canvas that was previously painted with multiple colors.  Next take a color of one’s choice (this will be the predominant color) and brush in acrylic paint over the entire canvas and the letters.  Let that color dry and peel off the letters to see your colorful wording appear as custom art.

Stencil custom art
Stencils may be purchased in craft stores and come in a large variety of patterns.  Stencils can create quick custom art using a wide variety of choices of colors and patterns and layering them together on watercolor paper or canvas.

Home Sweet Home: Deck the Halls…and every other room in the house

November 13th, 2014

fireplaceAs winter holidays unfold, here are some ideas to simplify, beautify and bring cheer to one’s holiday home.

By Cathy Osoria

Keep the color palette simple — Sticking to two or three colors makes decorating easy, and the end result looks thought out and put together. Traditional colors such as red, gold and green are Christmas decorating staples, or Christmas can be more whimsical by decorating with teal, pink and silver accents instead.  Adding lime green instead of holly green to the red and gold Christmas colors also adds whimsy.

Holiday lighting — LED pre-lit trees are a popular choice because they last thousands of hours longer than traditional lights and use almost 80 percent less electricity.  LED lights are usually brighter than traditional bulbs so less strands can be used when decorating to get the same visual impact. A Christmas tree should be lit from the top down working in sections rather than wrapping around the tree. Work the lights in towards the trunk of the tree, and then back out to the tip of the next branch.

Spotlights can be placed on top of cabinets and aimed toward focal objects that should be highlighted more than the surrounding decor. A spotlight can draw focus onto a wreath hanging on a fireplace or door or a Santa’s face in a table centerpiece.

Copy of untitledUsing good sense — Scents of pine, eucalyptus, apple cider and freshly baked cookies can all be purchased in scented holiday candles. Place candles near your entry and throughout your home to create an inviting holiday sensation. Boiling cinnamon sticks, cloves and oranges will get guests in the holiday spirit. It’s always good to decorate using lots of candles. Nothing makes a room feel warmer and more inviting than candlelight.

Mix styles — Try juxtaposing natural elements with sparkle. Don’t be afraid to spray paint an old object with metallic paint and possibly add glitter to create a metallic makeover. Natural elements like branches, leaves, feathers, pinecones and berries make good additions to mix with the metallics so they play off each other.

Decor with double duty — Buy ornaments like glass snowflakes and hang them from tree branches either inside or outside when entering the home. Guests will enjoy their beauty during the party and be able to choose an ornament to take with them as a party favor when they leave.

IMG_0260Bigger is better — Group collections and display in one area using different levels create more visual interest than spreading the collection around. Instead of hanging individual ornaments on the tree, save time decorating by wiring the ornaments together and using them in a cluster on the tree or wreath.  Instead of a traditional bow, ornaments can be hung with varying lengths of ribbon from the top of a wreath to create an unexpected modern look. Big oversized ornaments can be placed closer to the tree trunk to make the tree appear to have more depth and create more sparkle.

Time savers — Tree enhancers are simple to make and easy to install and make a Christmas tree look  larger and more plump and professional.  Enhancers combine a long piece of artificial greenery, branches, ribbon, ornaments and maybe a sparkly accent piece. The greenery is layered with a branch, and these pieces are wired together at the top. Then ribbon is tied around the wire and a bow is tied with the tails of the bow hanging to the bottom of the greenery. The ribbon tail is then attached with wire at the bottom and an ornament added, dropping off the end of the enhancer. Sparkly accents can be added and placed in the arrangement. Enhancers made in varying lengths can now be tucked into the Christmas tree. Pre-making enhancers saves time from hanging each of those items individually onto the tree. It’s faster to take the tree down, and they pack really well in a storage tub.

Bay Area Houston Magazine